Product docs and API reference are now on Akamai TechDocs.
Search product docs.
Search for “” in product docs.
Search API reference.
Search for “” in API reference.
Search Results
results matching
results
No Results
Filters
Install and Configure Collabora CODE
Traducciones al EspañolEstamos traduciendo nuestros guías y tutoriales al Español. Es posible que usted esté viendo una traducción generada automáticamente. Estamos trabajando con traductores profesionales para verificar las traducciones de nuestro sitio web. Este proyecto es un trabajo en curso.
Collabora is a fully-featured open-source alternative to popular office suites such as Microsoft Office. The Collabora Online Development Edition (CODE) edition is the online development version of Collabora. It is typically integrated into the front end of a file storage application such as Nextcloud. This guide explains how to download, install, and configure the CODE edition of Collabora. It also demonstrates how to connect Collabora and Nextcloud, both running on the same Linode, using the Nextcloud Hub.
What is Collabora?
Collabora CODE is a free open-source office productivity suite based on LibreOffice. It includes text editing, spreadsheet, presentation, and vector graphics software applications, along with a note-taking utility. It can handle all major document formats, using WYSIWYG formatting to preserve the layout of each document. It includes a shared editing feature and allows users to import and view over one hundred different types of documents.
Collabora is available in desktop and online editions. Products include the commercial Collabora Online enterprise edition, and CODE, which is the free development stream. New CODE releases are distributed about once a month, but CODE is considered less stable than Collabora Online. It is suitable for students, home offices, and small businesses, but it is not recommended for high-capacity production environments.
Collabora can be installed on a private server or hosted in the cloud. It requires either a helper application like Nextcloud or a custom wrapper. Nextcloud is an open-source self-hosted file storage solution that emphasizes security and privacy. Nextcloud and Collabora have worked together to integrate the two applications. Within the Nextcloud application, Collabora CODE is known as Nextcloud Office.
To use Collabora from the Nextcloud interface, install both Collabora and Nextcloud and configure each application separately. Then, integrate Collabora into Nextcloud using the Nextcloud administrative hub. This allows users to view and edit Collabora documents directly within Nextcloud. When accessed in this manner, Collabora features full editing capabilities and enhanced security and is accessible from mobile devices.
Before You Begin
If you have not already done so, create a Linode account and Compute Instance. See our Getting Started with Linode and Creating a Compute Instance guides.
Follow our Setting Up and Securing a Compute Instance guide to update your system. You may also wish to set the timezone, configure your hostname, create a limited user account, and harden SSH access.
Create and configure a subdomain name and point it at the Linode. This subdomain name provides access to the Collabora instance. The subdomain is required in addition to the domain or subdomain name used to access the Nextcloud instance. For more information on domains and how to create a DNS record, see the Linode DNS Manager guide.
Collabora CODE requires a supporting storage application such as Nextcloud. For information on configuring Nextcloud, see the Linode guide to installing Nextcloud on Ubuntu. This guide assumes Collabora is being installed on the same server as Nextcloud.
sudo. If you are not familiar with the sudo command, see the
Linux Users and Groups guide.How to Install and Configure Collabora CODE
Before installing Collabora CODE, ensure Nextcloud or an equivalent application is already installed, configured, and ready to use. Create an administrator account to access the Nextcloud dashboard.
Collabora requires its own domain name, but it functions as an embedded application within Nextcloud, not as a stand-alone website. Nextcloud transmits queries and requests to the Collabora domain, so users do not have to know anything about Collabora. Normally the Collabora server uses a subdomain of the main domain name. The Nextcloud server can either use the main domain name or the name of a second subdomain. For instance, the Collabora server might be named collabora.example.com, while Nextcloud is accessed through nextcloud.example.com or example.com.
These instructions are designed for the Ubuntu 22.04 LTS but are similar to earlier releases. For instructions on how to install Collabora on other distributions, see the Collabora Linux packages documentation.
How to Install Collabora
Collabora CODE is more straightforward to install than Nextcloud. Typically, Collabora prerequisites are installed when Nextcloud is installed. To install Collabora CODE, follow the steps below:
Import the Collabora CODE signing key.
cd /usr/share/keyrings
sudo wget https://collaboraoffice.com/downloads/gpg/collaboraonline-release-keyring.gpg
Create a source file for the Collabora CODE package repository.
sudo vi /etc/apt/sources.list.d/collaboraonline.sourcesAdd the following information to the file and save it.
- File: /etc/apt/sources.list.d/collaboraonline.sources
1
2
3
4
Types: deb URIs: https://www.collaboraoffice.com/repos/CollaboraOnline/CODE-ubuntu2204 Suites: ./ Signed-By: /usr/share/keyrings/collaboraonline-release-keyring.gpg
Update the repository.
sudo apt update -yInstall Collabora CODE using
apt.sudo apt install coolwsd code-brand -y
How to Configure Collabora
Collabora configuration depends on an XML file at /etc/coolwsd/coolwsd.xml. Although this file can be edited directly, it is faster to use the coolconfig tool to make configuration changes. To configure Collabora, follow the steps below:
With the current configuration, the
coolwsdservice continues to fail and restart. This happens because Collabora cannot establish an HTTPS connection with the local host. Use thecoolconfigtool to disable HTTPS on the connection.sudo coolconfig set ssl.enable false sudo coolconfig set ssl.termination trueOnly certain designated hosts are allowed to access the Collabora server. To designate Nextcloud as a trusted client, set
storage.wopi.hostto the Nextcloud domain, for example,nextcloud.example.com. In the following command, substitute the real domain name in place ofexample.com.sudo coolconfig set storage.wopi.host nextcloud.example.comCreate an administration account and provide a password for the account. When prompted, enter the
admin username. Then, enter theadmin passwordtwice.sudo coolconfig set-admin-passwordRestart the
coolwsdservice and verify the service status.sudo systemctl restart coolwsd sudo systemctl status coolwsdcoolwsd.service - Collabora Online WebSocket Daemon Loaded: loaded (/lib/systemd/system/coolwsd.service; enabled; vendor preset: enabled) Active: active (running) since Tue 2022-12-13 14:42:09 UTC; 7s ago
How to Configure the Collabora Virtual Host
Both NGINX and Apache require a Collabora virtual host to serve the Collabora application. This guide uses NGINX. To configure an NGINX virtual host, follow the steps below:
proxy, proxy_http, proxy_connect, and proxy_wstunnel modules using the a2enmod command.Create a
collaboraNGINX virtual host file.sudo vi /etc/nginx/sites-available/collaboraAdd the following configuration to the file. Change the value of
server_namefromcollabora.example.comto the name of the Collabora subdomain.- File: /etc/nginx/sites-available/collabora
 1
 2
 3
 4
 5
 6
 7
 8
 9
10
11
12
13
14
15
16
17
18
19
20
21
22
23
24
25
26
27
28
29
30
31
32
33
34
35
36
37
38
39
40
41
42
43
44
45
46
47
48
49
server { listen 80; listen [::]:80; server_name collabora.example.com; error_log /var/log/nginx/collabora.error; # static files location ^~ /browser { proxy_pass http://127.0.0.1:9980; proxy_set_header Host $http_host; } # WOPI discovery URL location ^~ /hosting/discovery { proxy_pass http://127.0.0.1:9980; proxy_set_header Host $http_host; } # Capabilities location ^~ /hosting/capabilities { proxy_pass http://127.0.0.1:9980; proxy_set_header Host $http_host; } # main websocket location ~ ^/cool/(.*)/ws$ { proxy_pass http://127.0.0.1:9980; proxy_set_header Upgrade $http_upgrade; proxy_set_header Connection "Upgrade"; proxy_set_header Host $http_host; proxy_read_timeout 36000s; } # download, presentation and image upload location ~ ^/(c|l)ool { proxy_pass http://127.0.0.1:9980; proxy_set_header Host $http_host; } # Admin Console websocket location ^~ /cool/adminws { proxy_pass http://127.0.0.1:9980; proxy_set_header Upgrade $http_upgrade; proxy_set_header Connection "Upgrade"; proxy_set_header Host $http_host; proxy_read_timeout 36000s; } }
Enable the Collabora site on the server by creating a symbolic link in the
sites-enableddirectory.sudo ln -s /etc/nginx/sites-available/collabora /etc/nginx/sites-enabled/collaboraTest the file syntax to ensure it does not contain any errors.
sudo nginx -tRestart NGINX and verify its status.
sudo systemctl reload nginx
sudo systemctl status nginx
How to Enable HTTPS for the Collabora Domain
The steps in this section explain how to use Certbot to request a Let’s Encrypt TLS certificate and enable HTTPS support. The snap package manager can be used to install Certbot. For additional information about Certbot, Let’s Encrypt certificates, and HTTPS, consult the
Linode guide to Using Certbot on NGINX.
Install the
snappackage manager.sudo apt install snapd sudo snap install coreRemove the old
certbotpackage and usesnapto install the newercertbotSnap. Then, create a symbolic link to the new directory.sudo apt remove certbot sudo snap install --classic certbot sudo ln -s /snap/bin/certbot /usr/bin/certbotRun the
certbotcommand to request and install a Let’s Encrypt TLS certificate. The--nginxoption allows Certbot to modify the NGINX virtual host file for the domain.During the certificate granting process,
certbotprompts for more information. Some of these questions might not appear if you have used Certbot on this particular Compute Instance before. To request a certificate, follow the guidelines below:- Enter the administrator’s email address when requested to do so. Let’s Encrypt sends renewal notices and other relevant updates to this email address.
- Enter
Yto agree to the Terms of Service. EnterNto end the program. - Certbot asks for permission to register the address with the Electronic Frontier Foundation. Enter either
YorN. This does not affect the rest of the installation. - Enter the Collabora domain name, for example,
collabora.example.com, or choose the correct name from a list. Ifcertbotdisplays a list, select the number corresponding to the Collabora domain.
The
certbotprogram confirms the results of the certificate request and displays any error messages.certbotautomatically schedules the certificate for auto-renewal.sudo certbot --nginxRequesting a certificate for collabora.example.com Successfully received certificate. Certificate is saved at: /etc/letsencrypt/live/collabora.example.com/fullchain.pem Key is saved at: /etc/letsencrypt/live/collabora.example.com/privkey.pem This certificate expires on 2023-03-14. These files will be updated when the certificate renews. Certbot has set up a scheduled task to automatically renew this certificate in the background. Deploying certificate Successfully deployed certificate for collabora.example.com to /etc/nginx/sites-enabled/collabora Congratulations! You have successfully enabled HTTPS on https://collabora.example.comReload NGINX to incorporate the changes.
sudo systemctl reload nginx
How to Connect Collabora to Nextcloud
To use Collabora as a Nextcloud application, connect the Collabora server to Nextcloud via the Nextcloud Hub. Within the Nextcloud context, Collabora CODE is named “Nextcloud Office”. To attach Collabora to Nextcloud, follow the steps below:
Navigate to the address of the Nextcloud domain and log in to NextCloud using your credentials.
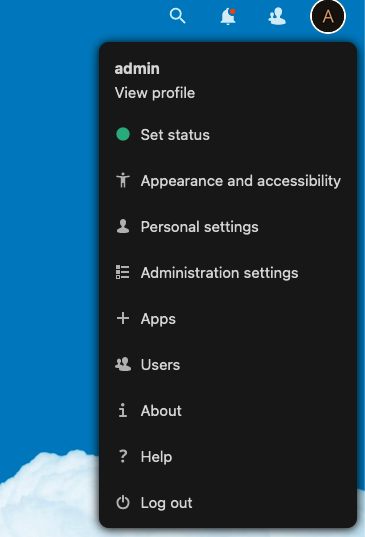
Click on the administrator profile, represented by a circle in the upper right-hand corner of the window and choose + Apps to view the applications panel.
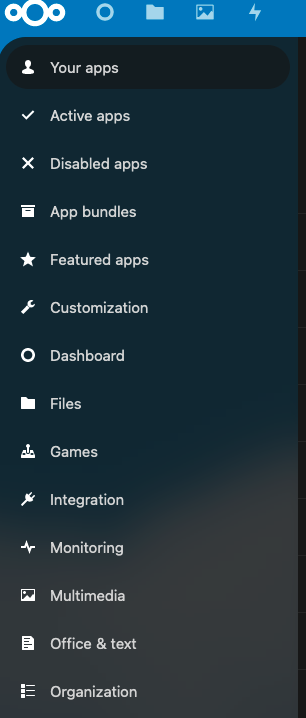
On the applications panel, click the link for Office & text on the left-hand side navigation panel.
The subsequent page displays all the office and document management applications. Scroll through the list or use the search function to find the
Nextcloud Officeapplication. Click the Download and enable button beside the application.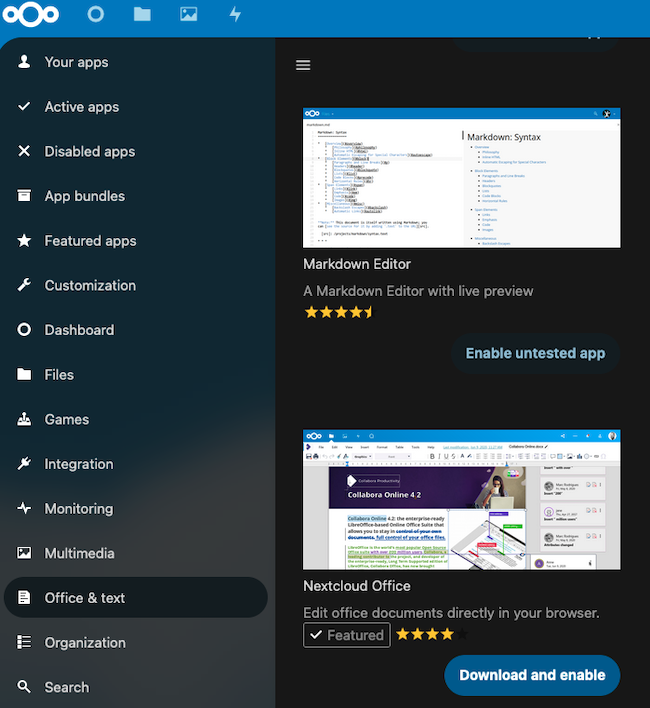
Open the administrator profile by again clicking on the circle on the upper right of the screen. Select the Administration settings link.
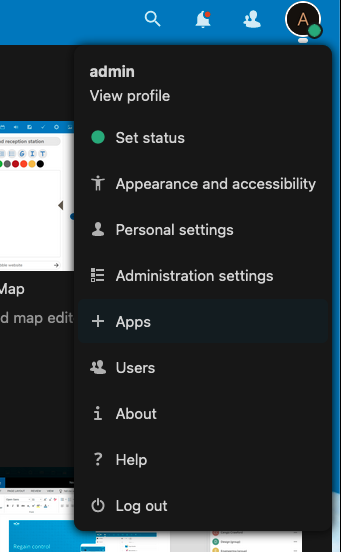
On the left-hand side navigation panel, scroll down until the Nextcloud Office setting appears and click the label.
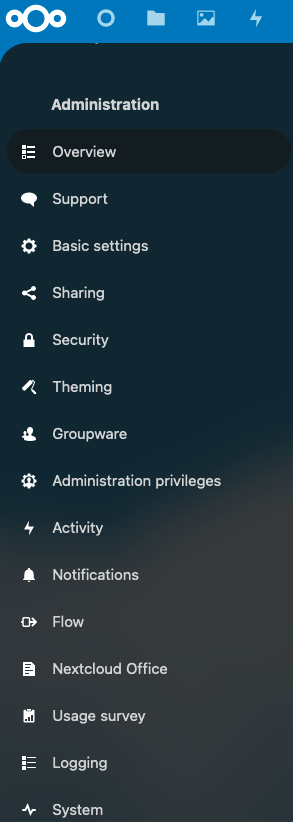
Nextcloud displays the
Nextcloud Officesettings. Enable theUse your own serversetting by clicking the radio button. This reveals a text box for entering theURL (and Port) of Collabora Online-server. Enter the Collabora subdomain here, for example,https://collabora.example.comand click Save. If the connection is successful, Nextcloud confirms theCollabora Online server is reachable.Note If Nextcloud states the Collabora is unreachable, consult the Nextcloud Office Troubleshooting guide.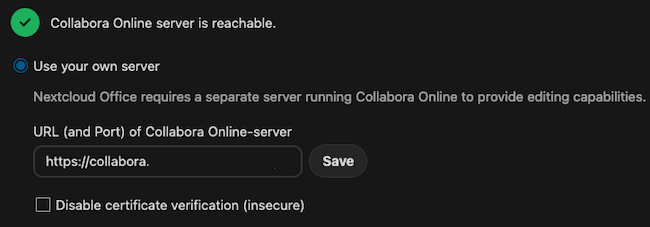
Locate the
Advanced Settingssection further down the page. Make sure theUse Office Open XML (OOXML) instead of OpenDocument Format by default for next filescheckbox is checked. This ensures all files are compatible with Microsoft Office. For added security, enter the name of the Collabora domain name besideAllow list for WOPI requests.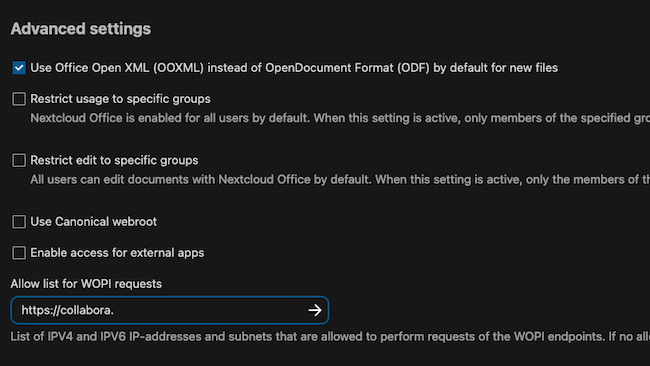
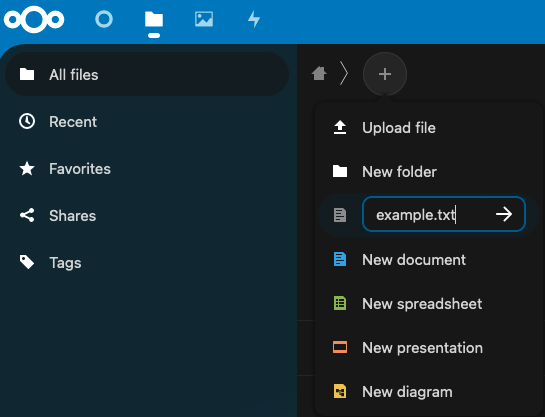
To create a new file, click the file folder icon on the top menu bar. This presents the
All Filesscreen. Click the + symbol to the right of the home icon and the>symbol. A list of the potential file options appears.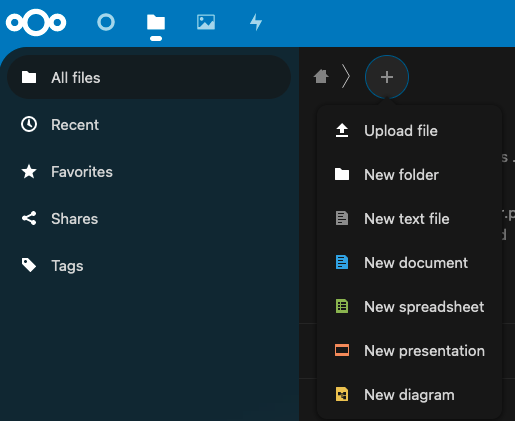
Provide a name for the file and click the right arrow icon to create it. Base the file on a template or start with a blank file. Enter the contents of the new file. Nextcloud auto-saves the file whenever it changes. Close the file using the X button on the top right when done.
Additional information on how to use Nextcloud Office is available in the Nextcloud Web interface documentation.
Conclusion
Collabora is a free open-source office suite application that is an alternative to Microsoft Office. It is typically embedded as an application within Nextcloud, but other configuration options are available. Add the Linux package and use apt to install Collabora. Use the coolconfig utility to configure Collabora and then add a virtual host for the application. To integrate Collabora into Nextcloud, connect it using the Nextcloud Hub. For more information on Collabora, see the introduction to Collabora CODE.
More Information
You may wish to consult the following resources for additional information on this topic. While these are provided in the hope that they will be useful, please note that we cannot vouch for the accuracy or timeliness of externally hosted materials.
- Collabora Office
- Collabora CODE
- Nextcloud
- Collabora and Nextcloud integration
- Advanced Nextcloud Office Application Settings
- Nextcloud Office Troubleshooting guide
- Nextcloud Web Interface Documentation
- Collabora wrapper/integration documentation
- Collabora instructions for other Linux packages
- Collabora SDK documentation
- Certbot
This page was originally published on

